
By Marci Liroff
As many projects are asking for you to self-tape your audition as a form of pre-screening, many of you have asked how to self-tape your auditions. For some, the mere idea of this can be daunting. I urge you to get comfortable with doing this. It’s not as hard as it may seem. If you think about it, you’re actually the actor, director, and producer of your own audition! You are finally in control of your audition!
Here are some instructions that you should follow.
Pay attention to ALL of the instructions that the CD or website gives you. If they tell you to do it a specific way, DO IT THAT WAY!
Know the material. Be as off-book as possible so that you can interact with your scene partner (who’s off-camera). Try to find a good reader – it’ll really help your audition. It’s ok to hold your sides, but we don’t want to see you literally reading off the page.
Check out my article “Self-Taping Using your iPhone” if you’re going to use your phone.
TECHNICAL STUFF
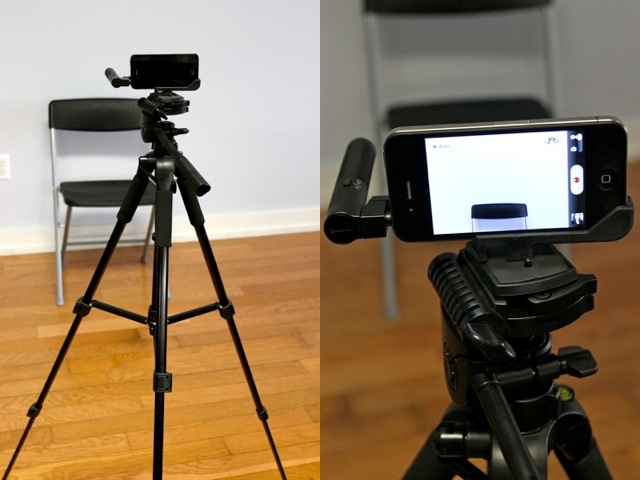
TRIPOD:
This is important! Make your audition as professional as possible by attaching your camera to a tripod. Nobody wants to watch an audition on a hand-held camera. If you don’t have access to a tripod (or can’t borrow one!), prop your camera on a table on top of some books so that it matches your eyeline (never shoot under your chin – that look isn’t good on anyone!)
Here’s a tripod adapter for your iPhone
LIGHTING:
The best thing is to use natural light. Make sure you’re not shooting TOWARDS a window or the light, but that the natural light is actually lighting YOU! If you don’t have natural light, then get some appropriate lighting. You can actually use lamps if you don’t have real lights. You can even use those wonderful large globe Chinese Lanterns (w/the white shades) – those throw a lot of nice soft light.
Go onto YouTube and search for “3 point lighting“.
You’ll get A LOT of videos how to do this. This will make your video look very professionally done and you can even do it on the cheap if you’re going to be doing this at home a lot. Go to Home Depot and get some “work lights”, and you can fashion a stand for them.
One of my Twitter followers just sent me a link to Cowboy Studio which has inexpensive lighting packages.
Make sure you “white balance” your camera before you start shooting. Many cameras these days have an auto-white balance. If yours doesn’t, check the instructions and figure out how to do it. In many cases, you can just hold up a white piece of paper about 5 inches in front of the lens and that’ll do the trick.
THE BASICS:
1. Find a quiet and well lit room.
2. Have the actor stand in front of a blank white, blue or grey painted wall. You can always use a plain sheet (no prints please).
3. Have someone other than the actor (the “reader) reading the supporting lines off camera. Do not attempt to do a scene by yourself unless it’s a monologue. Even then, have a friend operate your camera. Have your “reader” stand RIGHT NEXT TO the camera – almost hugging the tripod. EYE LINE! This is very important. So often the actor is reading to a partner that is SO far away from the camera, all we see is his profile. Make sure the actor looks at the reader during the scene and not directly at the camera.
4. You want to frame CHEST UP – not too much head room. Make sure we can see your face. You should stand about 3-5 ft. from the camera. Some projects ask for a full body shot as well to include before or after you do your scene.
5. Camera should be at eye level or just slightly above, NEVER underneath your chin.
6. Record a test sample first and see how it looks and sounds on the computer first to make final adjustments before taping the scenes.
7. When you are ready to record the scene, make sure the actor adds a verbal “slate” first by saying their name, the city they are from and role they are reading for. I also like to know how tall you are. Make sure that your slate is a SEPARATE take from your audition scenes. Don’t just roll from your slate right into the scene – that’s an amateur move. Some CDs request a slate on a piece of paper w/the pertinent info. Just make sure we can READ IT! Edit your slate and your audition together into one video file.
9. Record the scenes 2 or 3 times(or as many times as you need), pausing between takes so that you can pick the best one once youʼve had a chance to review them. Only include your best take.
10. Make sure your audition is labeled with all your contact info clearly on the clip – you can do this before and after – it never hurts to be sure. This is very important. We need to be able to reach you if we want to call you back or give you re-direction.
You can also self-tape from your webcam on your computer (a video camera is better, so ONLY do this if you have no other options). If you’re going to do it this way, I suggest you raise your laptop up a bit so that it’s not shooting “up” at you with an unflattering angle. You can also practice your upcoming auditions with your webcam and play them back so you can see what’s working and what’s not!
There you have it! Have I forgotten anything? Please let me know what works for you in the comments section.
Make sure to check out my new online course “How To Audition For Film and Television: Audition Bootcamp”. You can view it on your laptop or your mobile device and your subscription gives you lifetime viewing privileges for this course. I’ll be adding lectures throughout the year.
Glad you’re here – Marci


Recent Comments